This brand has been intriguing me for quite some time. There's been a bit of a buzz about it and the thing that drew me to want to try it was that it promoted a "less is more" approach to beauty, which as you probably know, I love. I think the whole industry actually needs a brand like this to shake up the whole drag queen look thing that is dictating at the moment, (even though, for me, Bobbi Brown started this movement in the late 90's and sadly since Bobbi left, the brand has not adhered to that...but moving on!!...)
Apparently it all began in 2010 on IntoTheGloss.com which is a very successful beauty blog with a loyal and influential readership and editors with a sixth-sense for what is relevant and what works. It was one of America's most popular beauty brands and has now taken the U.K by storm.
The philosophy was created by a group of Beauty editors that have literally tried everything and know what works. They have developed "the best formulations with real-life usage in mind and put them in the chicest packaging that won't cost you half a pay check. Beauty should be fun, easy, imperfect and personal."
I was excited to receive lots of Glossier products to try and dived right on in there! (with the help of my 18 year old daughter of course, who has been lusting over the products online for quite some time!)
Let me start with the packaging - modern, very chic and yes, recyclable.
I think the brand is aimed towards the younger market, teens and so on, or the lady who has great skin already and therefore, doesn't need much make-up or indeed someone who doesn't like to be seen to have an obvious face of make-up, as the textures are very sheer.
I wanted to compare how the products performed on both ages, (me being 48 and my daughter being 18.) I wanted to shake up my own make-up and was open to maybe weaning myself off my beloved, trusty Bobbi Brown make-up.
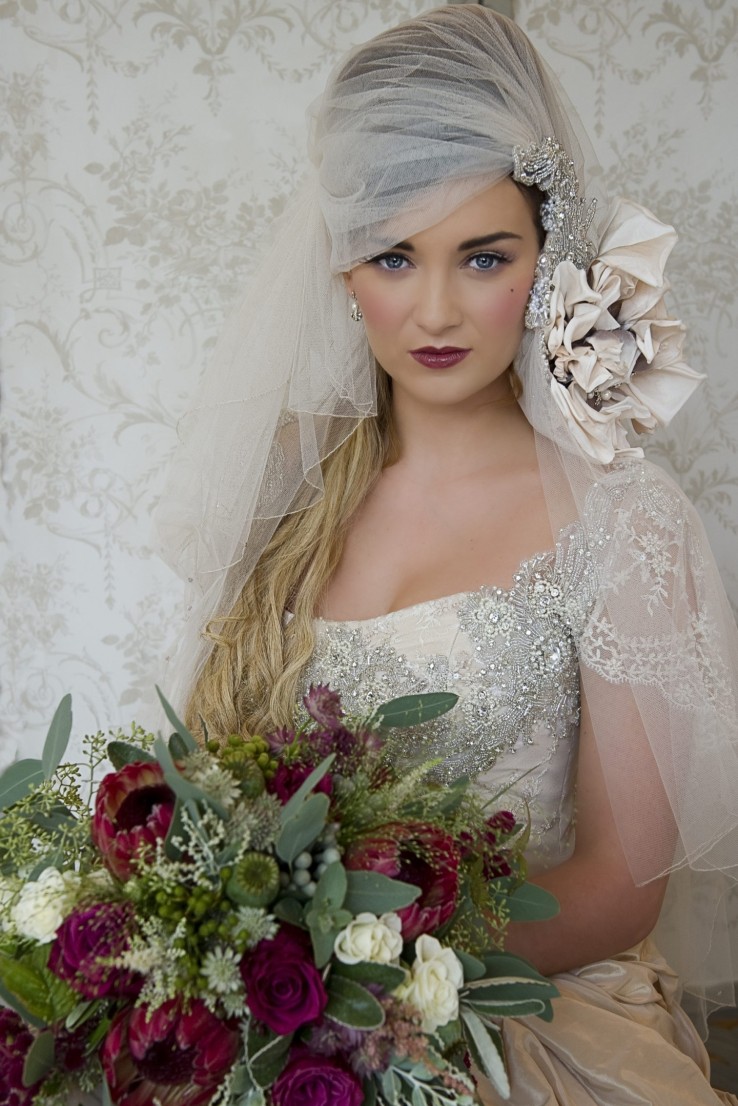
OK, lets start with Alisha, (my daughter's), make-up and skincare. Alisha has been suffering with acne for the past 2/3 years and we have tried literally everything and I am pleased to report that at the moment all is well skin wise. She is on the right medication and skincare, (Paula's choice). Both seem to be suiting her skin brilliantly at the moment. Her skin looks beautiful, and she is obviously therefore, more confident and happy...(phew!its been a while getting there.)
This is her skincare routine -
Paula's choice Clear pore normalising cleanser,(twice a day.) Clear regular strength 2% BHA exfoliant, (twice a day). Clear moisturiser SPF 30, (used before make-up.)
Alisha is now at the stage where she doesn't have to wear much make-up, and frankly, she has never been one of those girls who likes doing that, (I don't really understand why young girls feel they need to anyway, when they are young and if they have beautiful, young skin...why mask that?) Alisha did not want to upset her skin and is very particular about what she puts on her skin so decided not to try the Glossier concealer or skin tint. She has a very pale skin and is the lightest shade foundation from Bobbi Brown in Alabaster, which is what she used on this occasion with her usual NARS concealer in Chantilly. She only uses a tiny amount of each to even out her skin and cover any scarring.
I was honoured to be able to do the rest of her make-up for her! using the Glossier products, (she likes to do her own make-up usually and is a tough cookie to please!) I wanted to create an easy, natural, pretty, chic make-up look for her, just using purely my fingers. I started with her brows. Beautiful, natural and feathery already, (sob, sob!) I used Brown Boy brow. It comes with a great little brush applicator, perfect for getting those tiny little hairs and for styling brows. (There are 4 shades in total.) I sometimes mix the shades to create more definition and depth, if needed, (not on this occasion though.)
Eyes next and I was dying to use the Cloud paints! I chose the shade Beam. Now these are usually used for the cheeks but I used it on the eyes, cheeks and lips! I got great results. I just used my ring finger to apply all over the lid, above the crease and smudged away, very easy to work with and effortless. (I also applied a tad of the shade Dusk, just at the top edge of this and slightly in the crease of the lid, just for the hell of it.)
Next I used the Boy brow as a mascara - we had one in Black so I applied on the top and bottom lashes. Obviously it is formulated to give a little bit of oomph to brows, so not amazing thickness given on the lashes, but that was fine for the look we wanted.
I then used the Cloud paint on the apples of the cheeks in Dusk, (a to die for colour and worked with her skin tone beautifully.) The gel-cream texture just melted seamlessly into her skin. I used my ring finger again and blended out towards the hair line. Very easy to work with and a dream to use.
Next, I used the Haloscope highlighter straight from the bullet onto her skin, and blended with my finger. I used this high on the top of the cheekbones, under the arch of her brow and inner corner of eyes, down the bridge of the nose, above the cupids bow and a dot on her forehead. It created a natural, dewy highlight.
I then applied Cloud paint in Dusk on her lips and used a tiny amount of the Birthday balm to moisturise a bit and add sheen, (this actually smells like birthday cake, really gorgeous.) It also has little particles of shimmer in it too.
We were very impressed with the ease of application and effect given. We were a bit giddy to be honest...sad aren't we!
I then went onto to my make-up, which I knew from the off, (after doing Alisha's), that the products were not going to work hard enough for me. Obviously with me being that bit older and used to a bit more make-up. I need more definition and coverage...fact!
I used the following - Priming rich moisturiser. I have quite dry skin and love that dewy look, rather than matte. (However, I did apply my Bobbi Brown moisture balm SPF 25 on top as the Glossier moisturiser has no SPF, then used my Bobbi Brown Extra repair eye cream under my eyes.) There is a Glossier SPF available to buy, called Invisible shield, so you would apply this after moisturiser and before make-up, (I would loved to have tried this.) I have read reviews that suggest the ingredients do not cover full sun protection, but would love to know more...
I then used the Perfecting skin tint in Medium. It reminded me of MAC Face and body, but a much smaller bottle. However, it wasn't as pigmented but beautiful consistency. I needed more coverage than what it was offering. I also used the Stretch concealers in Medium on my skin and under my eyes, the shade light. Personally, because I like a bit more coverage under my eyes and on my skin, I was not a fan of these concealers and they did not last very well, I had to touch up with my usual concealers. I think they would be great for someone with younger skin though. (I did try a bit on Alisha in the shade light and it did last well and was a great shade for her.) I don't use powder on my face as I prefer that dewy look.
I then applied the Boy Brow in Brown. My brows are a bit more sparse, so I still had to fill in with my Anastasia Dip brow pomade.
I then used the shade Beam in Cloud paint on my eyes and blended. I like my definition along the top lash line so used my regular gel liner in Black for that together with my usual mascara.
Cheeks next - I used the Glossier Cloud paint in Haze which gives a beautiful, natural flush to the cheek, as without that flush, I look, well, dead to be frank! I then used the Haloscope highlighter in Topaz, (which is a bit warmer than the other 2.) I then used the Cloud paint in Dusk on my lips and finished with the Glossier Rose balm, which smells gorgeous.

Tina using GLOSSIER
All in all, we both loved the Glossier products, and I am definitely going to be adding some of the products to my kit. Great for clients who like that effortless, pared down, minimal look. Excellent value for money and very cool products. It's a yes from me, (but give me more coverage and longevity), and a YES from Alisha!
Available from www.glossier.com